How to Install Solar Panels on Your Roof?

Installing solar panels is not simply a matter of placing modules on shingles and connecting wires. A safe project begins with understanding your roof, electricity use, local climate, and applicable building requirements. This guide explains how to install solar panels on roof surfaces while keeping safety, performance, and long-term reliability in view.

A professional assessment should examine roof age, structural strength, slope, orientation, and shading from trees or nearby buildings. Morning shadows can reduce production more than many homeowners expect. An experienced installer will also review the main electrical panel, inverter location, cable routes, and emergency shutoff requirements. Permits and inspections may be necessary, depending on your location. Do not skip them.

Small details matter. A cracked tile can worsen under foot traffic. Poorly sealed penetrations may allow rainwater into the attic. Loose wiring can create avoidable hazards. Certified equipment and qualified electrical work provide stronger protection than attractive online bargains. That said, no installation plan is perfect. Roof conditions can change, weather can delay work, and estimated energy savings may differ from actual results. Careful measurements help, but they do not remove uncertainty. Homeowners should compare several written proposals, verify installer credentials, and ask how maintenance will be handled. This article follows the process from planning and roof preparation to panel mounting, electrical connections, inspections, and ongoing monitoring. Practical decisions matter most.
How to Install Solar Panels on Your Roof?

Assess Your Roof, Energy Needs, and Local Requirements

Before planning panel placement, inspect the roof as a working surface, not just an empty rectangle. Check its age, material, slope, drainage, and shaded areas. A cracked tile, soft decking, or rusty flashing can become expensive after installation. The U.S. Department of Energy recommends evaluating roof condition before adding solar equipment. If replacement may be needed within a few years, coordinate both projects carefully. I have seen attractive layouts fail because installers overlooked a chimney shadow at 3 p.m.

Your electricity use should guide system size. The U.S. Energy Information Administration reported average residential consumption of about 899 kilowatt-hours monthly in 2022. Review twelve months of utility bills, seasonal peaks, and future changes, such as an electric vehicle or heat pump. The National Renewable Energy Laboratory’s PVWatts tool estimates production using location, system size, tilt, and losses. Treat its result as a planning estimate, not a promise. Weather, dust, snow, and imperfect orientation still matter.

Local requirements can change the design before any equipment reaches the roof. Confirm building permits, structural review, utility interconnection rules, fire-access pathways, and any neighborhood restrictions. Some jurisdictions require rapid-shutdown equipment or specific setback distances. Ask for written requirements from the permitting office and utility, rather than relying on informal advice. A qualified installer should document roof loading, expected annual generation, and inspection steps. I would also request a second assessment when the roof structure is old; confidence is useful, but untested assumptions are not.

How to Install Solar Panels on Your Roof?

Assess your roof, energy needs, and local requirements before choosing a solar system. The chart estimates annual electricity production for a 6 kW rooftop array under different average peak-sun-hour conditions.

Planning assumptions: A 6 kW system operating 365 days per year with an estimated 20% energy loss from temperature, wiring, inverter conversion, shading, and other system factors. Actual production depends on roof orientation, tilt, shading, local climate, and equipment.

  • Inspect roof condition, structural strength, available area, orientation, tilt, and shading.
  • Compare expected solar production with your annual electricity consumption.
  • Confirm building permits, electrical rules, utility interconnection requirements, and local setback regulations.

Choose the Solar Panel System and Installation Equipment

Choosing the solar panel system comes before drilling a single roof hole. I would begin with an energy audit, not a sales estimate. Review twelve months of electricity bills, roof orientation, shading, snow load, wind exposure, and future demand. The IEA PVPS Trends in Photovoltaic Applications 2024 report records more than 1.6 terawatts of global solar capacity. That growth does not make every system suitable.

Size the array around usable roof area and local solar conditions. A slightly smaller system may perform better than a crowded design with morning shade. Select modules with documented efficiency, temperature coefficients, and degradation data. NREL’s recent photovoltaic degradation analysis reports a median annual degradation rate near 0.5%. It is not zero. Leave room for reality.

Equipment selection matters just as much. Choose an inverter that matches array voltage, expected power, grid requirements, and ventilation conditions. Use corrosion-resistant racking, properly rated fasteners, weather-sealed roof penetrations, and UV-resistant cable management. Add monitoring that shows daily production, not just monthly totals. Batteries require separate checks for usable capacity, round-trip efficiency, backup loads, and safe placement. A battery is not automatically economical.

Ask the installer for structural calculations, electrical diagrams, equipment datasheets, and permit responsibilities. Check whether the roof needs repair first. A perfect panel cannot rescue a weak deck or aging shingles. I would also keep a conservative production estimate, because optimistic assumptions often hide the most expensive mistake.

Prepare the Roof and Plan the Panel Layout

Before solar panels arrive, inspect the roof from inside and outside. Look for sagging decking, cracked rafters, water stains, and brittle roofing. A small attic stain can signal a larger problem. Photograph each concern and record its location. An experienced installer should verify the roof’s age, pitch, load capacity, and attachment points. If repairs are likely soon, complete them before installation. I once underestimated shade from a nearby chimney. That mistake would have reduced winter production.

Draw a scaled roof plan using actual measurements, not a rough phone sketch. Mark ridges, valleys, vents, skylights, chimneys, and safe walking paths. Study seasonal shade from trees, neighboring buildings, and roof structures. South-facing areas often receive strong sunlight, but the best layout depends on local conditions and roof orientation. Keep clearances required by local fire and electrical codes. A licensed professional should confirm these requirements and secure necessary permits. A structural engineer may be needed for older homes or unusual framing.

Place panels in compact rows, while leaving space for inspection and future repairs. Avoid filling every available section. That looks efficient, but it can complicate maintenance. Check where conduit will enter the building, and keep penetrations away from drainage channels. Use sealed, approved fittings and document every attachment point. The plan may need revision after removing a few roofing tiles. That is normal. Precision matters more than a perfect first drawing.

Mount the Panels and Connect the Electrical Components

Mounting solar panels starts with a careful roof inspection. Check the structure, surface condition, and rafter locations before lifting any equipment. A weak or damaged roof should be repaired first. Measure twice.

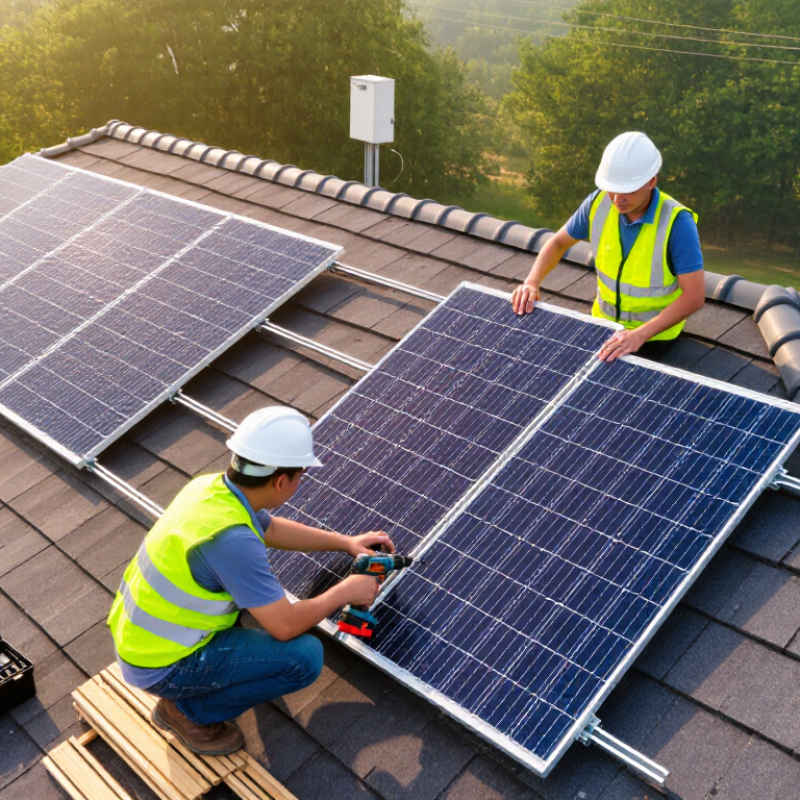
Mark each rail position so the panel rows remain straight and evenly spaced. Attach the mounting brackets to structural members, not only to roof sheathing. Use approved flashing around penetrations to prevent water entering the roof. Sealants alone can fail after years of heat, rain, and movement. Tighten every fastener to the manufacturer’s specified torque. Over-tightening may damage the frame or roof material.

Place the panels with enough clearance for airflow beneath them. Secure the modules, then connect the cables with correct polarity and weather-resistant connectors. Route wiring beneath the panels, keeping it away from sharp edges and standing water. Install grounding conductors and protective equipment according to local electrical requirements. The inverter, disconnects, and service-panel connections should be handled or inspected by a qualified electrician. Never work on energized circuits. A clear labeling system helps future maintenance. Before activation, test voltage, insulation, grounding, and shutdown functions. Small mistakes can remain hidden until the first storm. That is why a final inspection matters more than a rushed finish.

Inspect, Test, and Activate the Solar Power System

How to Install Solar Panels on Your Roof?

Inspect, Test, and Activate the Solar Power System

Before activation, inspect every roof attachment and cable route. Look for cracked tiles, loose flashing, exposed conductors, or water stains. Panels should sit firmly, with no movement under gentle pressure. Check that cables are secured away from sharp edges and standing water. Power stays off.

Inside, verify the grounding connections, circuit labels, and protective devices. A qualified electrician should test polarity, insulation resistance, voltage, and continuity with calibrated equipment. Compare each reading with the system design and local electrical requirements. Record every reading. Do not guess.

The inverter should remain isolated until wiring passes inspection. After confirmation, close the disconnects in the correct sequence and watch the startup display. The system may take several minutes to synchronize with the grid. Check for warning codes, unusual heat, buzzing, or a burning smell. Stop immediately if anything seems wrong.

I once assumed a tidy cable route meant the installation was sound. It did not. A hidden connector had loosened after strong wind. That small mistake changed my inspection routine. I now photograph connections, label shutdown points, and review the monitoring portal before leaving. Test the system again after the first sunny day, because early readings can reveal problems that a quick activation misses.

How to Install Solar Panels on Your Roof? - Inspect, Test, and Activate the Solar Power System

Stage Inspection, Test, or Installation Task Key Data or Typical Requirement Recommended Tools Acceptance Check
1. Roof Assessment Inspect the roof structure, covering, slope, shading, access routes, and available installation area before purchasing equipment. The roof should be structurally sound, weather-tight, and expected to remain serviceable for the planned solar system life. Avoid shaded areas where practical. Tape measure, roof plan, compass or digital site survey, structural inspection checklist No visible structural damage, active leaks, unsafe access conditions, or major obstructions in the proposed array area.
2. Energy Planning Review historical electricity use and estimate the required array size based on local solar conditions and available roof space. Use at least 12 months of electricity data when available. System output varies with location, orientation, tilt, weather, shading, and equipment losses. Utility bills, load profile, solar-production calculator, roof measurements Estimated annual production is compared with annual consumption, and expected losses and future electricity needs are documented.
3. Permits and Design Prepare the electrical single-line diagram, equipment layout, structural attachment plan, and required permit documents. Design must comply with applicable electrical, building, fire, utility-interconnection, and local safety requirements. Scaled drawings, electrical calculations, code references, permit forms Required approvals are obtained before installation, and the design identifies disconnects, grounding, cable routes, and overcurrent protection.
4. Mounting Installation Install roof attachments, flashing, rails, and panel clamps according to the approved structural layout. Attachments must be secured to suitable structural members, with waterproof flashing and clearances maintained around roof edges and obstructions. Torque wrench, drill, roofing tools, fall-protection equipment, level Mounting hardware is correctly positioned and torqued, rails are aligned, penetrations are sealed, and panels are securely clamped.
5. DC Wiring Connect panels into strings or approved module-level circuits, route conductors, and protect cables from abrasion, sharp edges, and water accumulation. Verify polarity, conductor sizing, connector compatibility, string voltage, and maximum system voltage under expected temperature conditions. Calibrated multimeter, insulation tester, cable clips, labels, insulated tools Polarity is correct, connectors are fully engaged, cables are supported, and measured open-circuit voltage is within the design range.
6. Inverter and AC Connections Install the inverter in an approved, ventilated location and connect the DC input, AC output, grounding, and required disconnects. The inverter must be compatible with the array voltage and current, protected from excessive heat and moisture, and accessible for service. Torque screwdriver, multimeter, clamp meter, cable labels, conduit tools Terminals are torqued to the specified values, conductors are labeled, disconnects are accessible, and enclosure covers are installed.
7. Grounding and Bonding Bond module frames, rails, equipment enclosures, and grounding conductors as required by the approved design and local rules. Grounding and bonding methods must provide a continuous fault-current path and use components suitable for outdoor exposure. Continuity tester, multimeter, torque tools, grounding hardware Continuity is verified across required bonded components, and grounding conductors are protected, identified, and securely terminated.
8. Pre-Activation Testing Perform a complete visual and electrical inspection before energizing the system. Check for correct polarity, expected voltage, secure terminations, insulation condition, clearances, labels, and absence of exposed live conductors. Commissioning checklist, multimeter, insulation tester, thermal camera where appropriate All test results are recorded and fall within the approved design limits before any switch is placed in the operating position.
9. Activation Energize the system in the sequence specified by the equipment instructions and approved commissioning procedure. The inverter should complete its startup checks and synchronize with the electrical grid only when grid approval and operating conditions allow it. Commissioning records, system display or monitoring portal, clamp meter No active fault codes are present, operating values are reasonable, and production data begins updating under sufficient sunlight.
10. Final Handover Complete the final inspection, submit required documentation, and explain shutdown, maintenance, monitoring, and emergency procedures. Provide system drawings, test results, equipment manuals, permit records, shutdown instructions, and maintenance recommendations. Handover checklist, document folder, monitoring access details, inspection report Owner receives complete records, understands the disconnect locations, and knows that roof or electrical work should be performed by qualified professionals.
Safety Note Solar modules can produce electrical power whenever exposed to light. Roof work, electrical testing, grid connection, and system activation should be performed by trained personnel using appropriate fall protection, electrical safety procedures, and local code requirements.
logo

SOLARIC Showroom Address:
54 E. Rodriguez Jr. Ave (C5), Warehouse #9, Bagong Ilog, Pasig

Schedule: Monday to Friday 7AM to 5PM. Saturdays 8AM to 3PM.

Solaric Corp. (by appointment only)
15/F Jollibee Tower, F. Ortigas Jr. Cor Garnet Rd., Ortigas Center, Pasig

Email: [email protected]

Cell/Text: +63-917-860-3141 | +63 908 377 5577

Solaric Equipment

For Solar Professionals, Contractors, and Installers

Call / Email to reserve/pickup/ request delivery: Monday to Friday 7AM to 5PM. Saturdays 8AM to 3PM

© 2013 - 2026 Solaric Corp. All Rights Reserved